in this lesson we are going to take an
image and crop it in simple regular
shapes and also irregular custom shapes
we are going to use one of my favorite
tools graphic designer I love it because
it's powerful and yet very easy to use
let's do it
okay this is what you'll see when you
launch Gravatt designer and you can
either enter a custom resolution width
and height or you can select from one of
these options I'm going to choose
website huge nineteen twenty by twelve
eighty pixels
okay so let's bring in an image we can
play around with I have one from
unsplash.com it's just an image of a
bunch of pets I'm going to resize this
to the full canvas and pull this over
while pressing shift to make it keep its
aspect okay I want to work with this
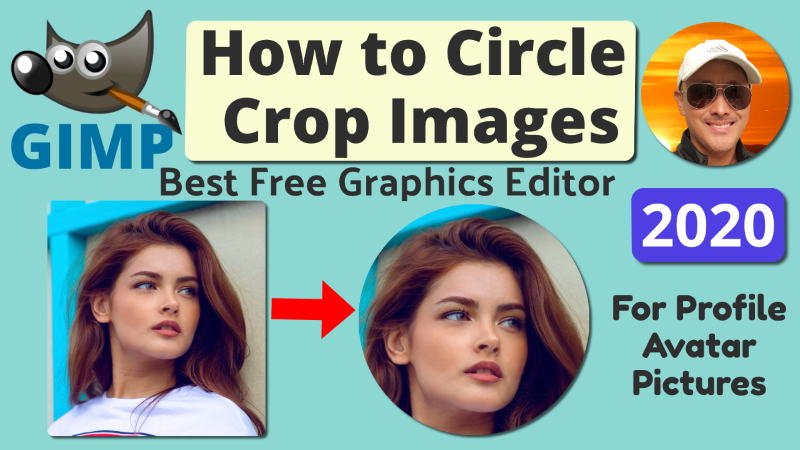
area okay let's start with a very simple
crop a square let's go to libraries and
shapes click this square you can adjust
it by dragging the corner okay now I
want to crop the image into this square
frame and now I'm going to press shift
and also click on the image so both the
image and the square is highlighted and
now I right click and select mask with
shape and there we have it so this is
what we can export with a new cropped
image and I'll show you real quick click
this button here that says advanced
export click selection make sure it's on
PNG and background let's choose
transparent and export give it a name
and save let's go take a look at it it's
right here so this is our new image
that's cropped as a square let's go back
to the canvas and I will do ctrl Z for
undo that's what you can do with any of
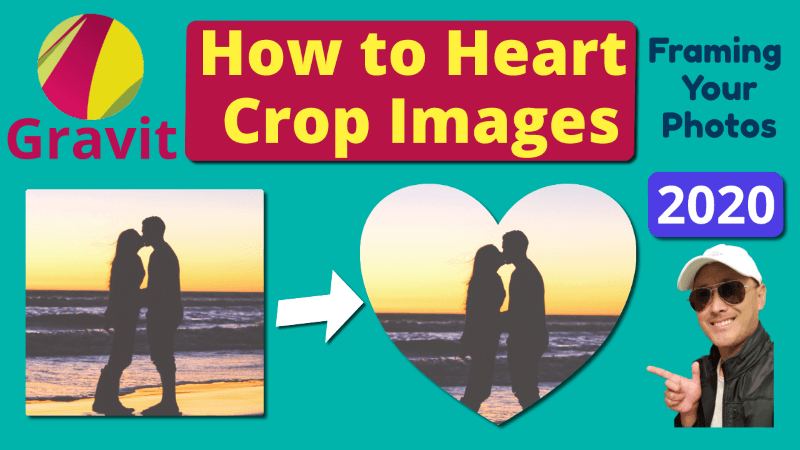
these images you can make it a circle
triangle a heart star and also you can
crop with these shapes where you draw
your own shape such as a rectangle
ellipse polygon triangle and a start now
let's do an ellipse if you hold down
shift the ellipse will be a perfect
circle okay if you let go of the shift
it'll allow you to shape that ellipse
the way you want make this or ellipse
and again so
image and the shape right-click and mask
and we have our ellipse okay now let's
put together two shapes into one okay
now we're going to combine two shapes
into one okay let's first draw a circle
and then let's choose a different shape
let's draw a rectangle okay now we want
to combine these two shapes together
let's drag the rectangle to overlap the
circle let's say that's the shape we
want the combination of these two shapes
and what we'll need to do is highlight
both shapes click one hold down shift
click the other both are now highlighted
in this one box and right click this
time select create compound so now these
two are in sync it's sort of like a
grouping they move together now but
they're not a combined shape yet so what
we have to do is right click again and
convert paths now the two shapes has
been molded into one new shape one
irregular shape one custom shape and now
we can use this to mask and get our
cropping into this irregular shape and
let's select the image while holding
down shift again right click and mask
and now we have this combined shape
that's made out of a circle and a
rectangle undo so now you know how to
crop images into regular shapes and also
a combination of shapes before
continuing the lesson let's take a quick
break tonight's program is brought to
you by Spaceballs the most extravagant
futuristic movie ever made
coming to a theater near you now we're
going to use the past tool to create a
custom shape which you can draw in any
way you want and in any detail so it
depends of how many points you want so
let's select the path tool let's start
from here and let's close this shape by
clicking on the first dot okay so this
is the path I drew I could have shaped
it any way I wanted to and if we did the
masking again it will look like this so
that's the custom way of creating your
own shape any irregular shape you want
another thing I want to show you is how
you can use this sub select option here
to reshape some of your objects so first
let's select a square and if you select
sub select or press D you'll see these
red dots show up and now you can drag
those and around the corners of your
square okay so that's how the square
works let's use a triangle and let's
select the sub select or press D and now
these points turn white and you can drag
these over and it will change the shape
of your triangle
[Music]
because if you weren't in the subselect
if you were just in the Pointer you
can't change the angles you can just
resize the same triangle or rotate it
and finally let me show you how you can
round your edges when using the path
tool so let's select a path tool click
here let's click here if you hold down
the button while clicking and move
around you can sort of bend these lines
and click another spot here bend it
again click another spot here you can
bend and thereby you have a more rounded
shape like that it's kind of like a
irregular blob a rounded shape and to
mask that it'll look like this and you
can export that and turn it into a
sticker or what have you and there you
go that's how you use gravity and crop
in different shapes whether it's regular
shapes or irregular customized shapes
thanks

 Like and
  Share it. It would be much appreciated.